Wednesday, May 29, 2013

Repurposed pretty jars and bottles

 
We all have bottles and jars in our refrigerator
that we can repurpose to make simple flower vases
The pictures turned out just okay.  Still learning to use my new camera
 (hence the date stamp that I could not figure out how to remove). 
 
 
salad dressing, vinegar and mayonnaise bottles -- soak and remove labels (smear peanut butter on the jars and the labels peel right off)
wash and dry bottles (completely)


Purchase sample paints from Lowes or Home Depot. 
Essex Blue, Young Green and  Ultra White were used


Pour paint into bottle and completely cover inside of bottle, pour out excess paint
Next, was the hard part- the bottles
 took FOREVER to dry on the inside even when sitting in the sun
Twine and keys purchased from Michaels and Archivers decorate the outside


Purchase simple roses and tubes from your local florist or grocery store
The single flower water tubes were .20 each


Monday, May 6, 2013

Ash-baked Orange Brownies - 5 easy steps


After grilling we always have an abundance of hot coals and nothing else to grill.  Inspiration came from a Young Women's Activity from the previous week and loads of fun (thanks Mandy and Carrie).  So today  ---- we tried this at home and here you have it ......
 Ash-baked Orange Brownies. 
 
 These are so easy and very scrumptious
Here's how you do it....in five easy steps 

Start with basics -- brownie mix, oranges, and aluminum foil


Step One 
Slice end of the orange cutting on this side (is this the navel side?)
  
Step Two
Using a spoon scoop out inside of orange
do not scoop out lid you just cut - the juices from the lid are needed when cooking
Your oranges should look like this when done
 now you are ready to add the brownie mix
  
Step Three
Make brownies following directions on package
Spoon brownie mix into orange shell filling about 2/3 full -
it will expand so do not overfill
This is Sarah spooning brownie mix into orange shell -
you can be as messy as you want
 
Step Four -
Place top on orange that you sliced previously
Using two sheets of foil--
Wrap covering entire orange
Use another sheet of foil and
Wrap again covering entire orange
 
 
Step Five
Place in hot ashes so orange is surrounded by the hot coals or ashes
 (no flames)
Cook for about 20 minutes
These were done in about 15 - the coals were very hot
 
 
Delicious .... and with a hint of orange


Thursday, May 2, 2013

A yearning for more...


 No pictures, no crafts--- just a simple reflection today while the winds blow and the chimes sing in the background.
Napping is foreign to me and has been for years.  What I would give to actually take a nap (an insomniac cannot nap)!  But today after another restless night a weary mind and body had to at least try.  Though sleep never came there was some rest gained.  The gusty winds brought me back from what should have been sleep ….and I began to think of my children, life, struggles and a conversation had earlier with friends. 
It takes great courage and strength to be more than what you currently are.  For some it is easy to attain what they have always dreamed of and for others it is the journey of a lifetime with a path that is rough and filled with much delay.  
They (my oldest children) are each uniquely different and yet such an inspiration to me.  There is one who I never thought would make it to manhood and he has overcome such odds.  He does not recognize it but he stood face to face and reached within the depth of his soul to stare a “devil” in the face of much adversity and overcome what most have never dreamed of and long for.   Another who again does not recognize his courage has reached within himself and faces his demons every day.  There are days he wins and days where it beats him down.  To them both – they have such a determination to keep going and a longing within them for something better. 
She has always succeeded in everything she attempts.  From an observer it appears to come with such little effort.  But she will tell you it has been hard work and perseverance.   Her life has been one filled with adventure and many blessings and a recognition that the Lord has been with her in every step of the way.  
When she was in middle school she would play this game with her friends---Out the door she would come walking like a model and pretend as though the cameras were flashing and people were calling her name ….. It was hysterical… she has never settled… always searching for a new adventure… always trying new things ….and always listening to the voice that guides and directs her. 
As I write this I see how they have each inspired me to be more than I am, more than I have ever wanted to be, and more than I thought I could ever be.   Through their determination, strength, perseverance, and courage I have found a renewed outlook, an awakening within, and a fresh perspective on dreams I thought were dead, non-existent, and unattainable.  
But isn’t it so that within each of us,  is that need to keep going, to never give up, and to see the best in everything, and believe that at the end of the rainbow is something  special just for us.  If only for a moment or a second – that is all we need to keep going. 
To my oldest three - who would have thought that you would become the teacher and I the student. 

Tuesday, April 23, 2013

Red Beet Eggs- A Pennsylvania Dutch Favorite

If you have never tried Red Beet Eggs here is your chance.  This was a childhood favorite and there was always a jar in the refrigerator with these eggs.  It definitely is popular among the Pennsylvania Dutch as we discovered while visiting Lancaster this past summer.  I must have eaten at least two dozen on our trip.  So Yummy!
 
The Recipe -
1 (15 oz) can of red beets
1 onion thinly sliced (I did not use the onion because we do not eat onions - I know kind of sad right- no one likes them in my house so no need for us)
12 hard cooked eggs (shelled and left whole)
1/4 cup sugar
1/2 cup vinegar (I used white vinegar)
 
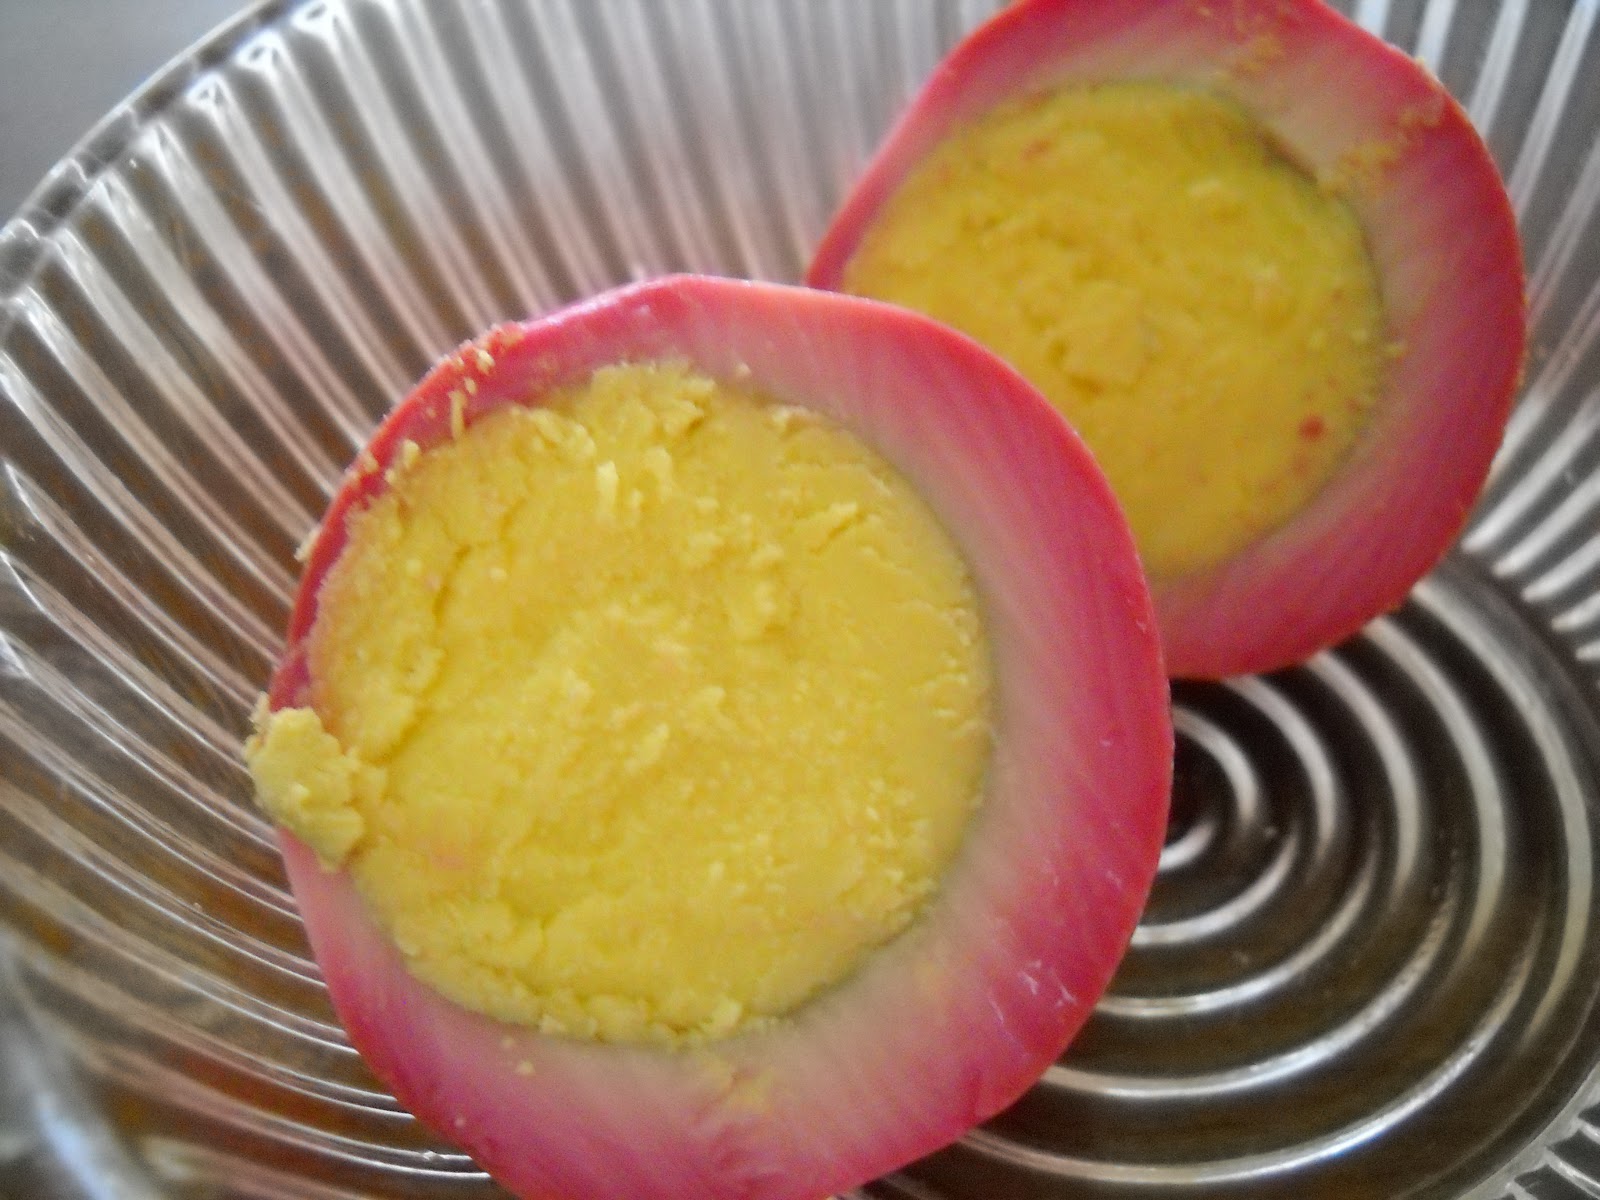
Drain liquid from the can of  beets into a saucepan.  Place onion, beets, and eggs into a container.  Pour sugar and vinegar into the saucepan with the beet juice and stir; bring mixture to a boil.  Reduce heat and simmer on low for 15 minutes.(you will need to burn a candle after this - house smells like vinegar). Pour the beet juice mixture over the beets, eggs, and onions.  Seal the bowl and refrigerate.  Refrigerate for at least one-three days; the longer they are allowed to sit the better and the deeper the color.  The pictures below are from one day.  These are great for salads and look really nice on a plate.

Enjoy


a dozen may seem like alot but believe me you will definitely wish you made more
 
The eggs soak in the color from the beets and vinegar
 

Ready for a salad - these are so good

Tuesday, April 16, 2013

The designs of an 8-year old interior decorator


A couple of months ago Sarah asked if she could decorate the mantel all by herself.   She wanted to pick out all the items, arrange them, and create a theme.  On Saturday we headed to Hobby Lobby where she carefully selected all the items (this took about an hour). 
The best part was to stand back and just watch as she made each decision. 

She started out with lavender candlesticks and birds colored in pink and purple (I was not sure about having those colors in the living room ---  but she was in charge).   

After going back and forth between the lavender and something antique -- the final decision was "birds."   Once everything was on the mantel she said, " we  need something else such as a banner."  We looked online for some examples and she decided on burlap and lace.  Burlap is always messy and attaching the little pieces were somewhat of a challenge but she did great. 

I wonder if she is growing up too fast to be thinking of decorating but then later that afternoon there was playing and jumping on the trampoline with friends, running through the sprinkler and whining that she had to come in.  No --- she is still that little girl with a flair for style like her older Sister. 


Bird or Pear - she went with the Bird


She wanted something rustic
 
Continuing with birds and adding some color


She found this at Target later in the day when we went to buy birthday presents


Chevron Burlap, beige and tan lace.  This was so inexpensive to make - $6.00
 
Burlap was everywhere but she did a great job

Wednesday, March 27, 2013

Favorite Easter and Spring make it yourself


March was a month of adventures in crafts from bunny burlap garland, egg shell flower cups, paint chip bunny garland, and distressed bird houses.  Not all were successful and some took several attempts.  Who knew there were so many colors and types of burlap.  Finally,  a sweet lady at Hancock Fabrics led me in the right direction after two hours of struggling at home with the wrong burlap.  I did however find a use for the messy burlap and a mason jar. In shopping I found some antique looking rabbits which look great on the mantel along with the distressed bird houses (worked on these to midnight one night because I am a perfectionist- really not a good combination for crafting - such sayin....)


Antique looking Rabbits - love these


Easter Egg cups from Target/ $1.00 each
 

use washed and dryed egg shells, acrylic paint and tacky glue.  The tacky glue strengthens the egg so it does not break apart so easily Add easter grass or moss and silk flowers


I loved how this turned out.  Begin with a mason jar, wrap burlpap (this was the first burlap I bought for the bunny garland - an absolute disaster for the garland)  around the jar and secure with tacky glue (yes, tacky glue is for everything), adhere felt ribbon or any ribbon or twine.  Add  twine to lip of jar and add flowers.  I always put pebbles in the bottom of a vase or jar as it  helps to hold the flowers in place.  The dogs were going crazy over the smell of the burlap - I could not keep them away from it


so pretty and inexpensive


This by far was my favorite.  Fun Fur really is fun.  The tighter you wrap the wreath
the better it looks.  Using decorative pearl stick pins secure the daisies into the styrofoam wreath
adhere butterflies using hot glue gun  and add  a little bird nest.  Used daisy ribbion to hang from the door


Bunny Burlap Banner - use tightly woven burlap, cotton balls, and pilk
felt for the nose.  I used the thin strips from the wider burlap as the bow and regular twine to hang the bunnies on--
hot glue the bunny to the twine.  I finally found a template for the bunny which was
easier to trace then draw freehand


Have a Wonderful Easter  


Saturday, March 9, 2013

Plush Memories - something real that lasts forever


Stuffed animals – we each had one or several and remember them well when asked.  They were our comforter in the night, a confidant and playmate for tea, pirates, dress-up and adventures.  They shared our lives as children and we could not imagine a day or going to sleep without them.
As we aged they were forgotten or replaced and carefully packed in a box to be stored in a remote area of the closet.  Years would go by before we would remember them or even open the box.  But when we did – childhood memories would flood our minds and tugs at the heart would emerge of long ago. We would hold in our hands a ragged and worn dear old friend.   Even in adulthood we cannot imagine parting with something so small yet significant.

My plush friend was a clown – a handmade sock clown with button eyes and patchwork material.  Sarah has a pink bunny that her daddy bought when she was two months old.  Bunny is everything to her.  She sleeps and travels with bunny and absolutely adores him.


Bunny and Clown
Courtney had Bugs – her favorite gift one Christmas.  She is now 24 and expecting her first child but Bugs is tucked safely away in a box in her old bedroom.  Jared's was a handcrafted Care Bear and Christopher a white lion.

Courtney and Bugs


Jared and Care Bear
Though we are grown and no longer require or need our beloved friend we will always remember with tenderness the security they provided and the love we felt when they were tucked beside us. This was and still is something real.
 What was your favorite stuffed animal?


Sarah with Bunny always right beside her
 
still....